
The holidays have come and gone and we're trying to get things back in order around here. Our home is a mess, the kitchen sink is full of dirty dishes, and I have a ton of laundry to catch up on but it's alllll good!
We had a wonderful Christmas! Kent and I opened gift together Christmas morning (he totally spoiled me; more on that later), made the trip out to my Mom's house, spent time with my family, played a few games, opened gifts, and ate tons of food! Christmas morning was a little stressful; no matter what time we get up it seems like we are always in a rush to get where we need to be.....I HATE that, but what can ya do. Once we made it to my Mom's things slowed down and we were able to relax enjoy the evening.
I got a late Christmas gift and came down with the stomach flu.....blah NO FUN! On a good note I did lose 10lbs :0) but let me tell ya it wasn't pretty. I'm feeling better though and ready to pack up our Christmas decorations and get the house all clean and organized.
Parker (our Yorkie) was a hoot this year. I've never met a dog that loves Christmas as much as he does. He LOVES to open his stocking and this year decided he wanted to open gifts too.
Here's a little clip of Parker helping me open one of my gifts......so funny! Please don't mind the non-makeup wearing, PJ clad girl in the background. ;0)
I'll be back tomorrow with a few pictures and I'll fill ya in on one my Christmas surprises.
Tuesday, December 29, 2009

Tuesday, December 15, 2009
Tis the Season for Giving (on a budget)
 I LOVE to give gifts! I love shopping/making them, wrapping them, and hopefully if I did a good job with all of the above seeing that special someone smile when they open them! This year like many others I’m trying to be as frugal as possible. When you have a BIG family like I do it’s not always easy to do but I’m doing things a little differently and thought I would share how I’m saving this year.
*I normally do not make a Christmas list but this year I did! Kent needs a little guidance in the gift giving department so I thought I would help him out. I asked for a few cook books and made sure I requested USED copies. I would much rather a USED book. Usually they are just as good as new ones and wayyyy cheaper.
This Martha Stewart book made it to my list and can be found at Amazon (used) for $5.00. If it was new it would cost $20.00! I don't mind a few bent pages.
*I’ve also gathered a few coupons for Kent to use should he decide to purchase an item from a certain store. I hang them on our chalkboard in our laundry room so they are there and ready for him if he wants to use them.
*Kent loves to get clothes for Christmas. It works out great for us because I get to pick them out (which I like) and he doesn’t have to go clothes shopping (which he is not too fond of). This year he requested that I buy him clothes from thrift stores. I had a hard time with the idea of wrapping up a used shirt but the more I talked to him about it the more I saw that he would really rather the clothes I bought be from Goodwill. I buy him goodies from Goodwill throughout the year, I just felt a little bad wrapping up something I paid a $1.00 for but I did it anyway and I found some really GREAT things! I washed everything first so they are all clean and wrapped under the tree. How lucky am I to have a guy that loves clothes from Goodwill!!
I bought a fun shirt similar to this one at thrift store. Shirts made by this Italian designer go for $80.00-$100.00. I picked one up for $2.99 what a steal!!!

I also picked up a Banana Republic long sleeve tee that looks a lot like this one for $2.99. It would have cost me $60.00 at the store.

*This year I’m doing a lot of homemade gifts. They do require a bit more time than going out to buy something but they come with a little extra love! I’ve tried to come up with things that are usable and would be something my friends and family can enjoy. I’ll share what I came up with after Christmas since a few family members read my blog. I’ve also notice that you can save if you make the gift multiple times meaning you are able to use any extra supplies to recreate the gift.

*My bud Jennifer and I have agreed to not gift anything NEW to each other this year. It can be something from Goodwill or something we made but nothing brand spanking new! I love this idea and have had fun being creative with it.
*All gift givers should have this book! I picked this little guy up in the clearance section at Half Priced books for $3.00. I’m loving this cookbook!!! It’s full of wonderful ideas for gifts from the kitchen and has some great gift wrapping tips. You can also find this guy on Amazon used for super cheap. It’s $ 15.00 for a new version at Barnes and Nobel.

Wednesday, December 09, 2009
Spill the Beans….What’s your Christmas Décor Obsession

Well it’s time to confess…….I’m completely and utterly obsessed with nutcrackers and I don’t care who knows it! I would say that I’m on the verge of needing some type of medication for my obsession ;o) If you were to go shopping with me in a Christmas store and noticed that I was missing, just look for me by the nutcrackers and you would find me drooling. I just can’t help myself!
This is my nutcracker tree. You should see me right now; I have the biggest smile on my face. I have no idea why but for some reason nutcrackers just make me giddy even looking at pictures of them makes me happy…….crazy I tell ya!
This is tree is very special to me. This was the tree that we put up when I was in high school. I used to decorate it every year with my Mom and my step-father. It was a tradition that Allen (my step-father) always put the tree topper on. Allen is no longer with us and I miss him dearly. Each year when I put this tree out I think about the Christmases we had together and Allen pulling out the ladder to put the tree topper on. I hope this tree last forever.
See all the nutcracker ornaments? They are another reason why I love this tree so much. My friends and family know how ga-ga I am over nutcrackers. They are sweet enough to give me a few nutcracker ornaments to add to my tree each year. I find a place on the ornament that no one can see and write the name of the person that gave it me as well as the year. Each year when I pull out my nutcracker ornaments I love looking at all the names and dates. It’s a fun way to remember the person that gifted it to me.

A few from my collection. You can click on the image to enlarge the photo.


All of my nutcrackers are special to me but this little guy even though he’s not sparkly and little old has a special place in my heart. He was my 1st nutcracker and a Christmas gift from my aunt when I was eight years old. That was the first year I saw the Nutcracker ballet and fell completely in love with it.
For Christmas all I wanted was a nutcracker of my own, no Barbies, no dolls, just a nutcracker was all that I asked for. I opened my gifts Christmas morning hoping to find a nutcracker nestled inside one of the boxes but no such luck. I received a ton of wonderful gifts but NO nutcracker….I was disappointed :o( I know, what a brat and a silly brat at that! What eight year old only wants a nutcracker for Christmas? I played with all my new toys but was sad that I didn’t get the one thing I asked for. Later in the evening my extended family came over for Christmas dinner. We opened gifts together and I was floored when I opened a gift from my aunt……it was a green nutcracker the very one in the picture below!!! I was sooo happy and my family got a kick out of seeing me get so excited over a nutcracker. It was love at first sight! I carried that thing every where I went….thus the birth of my nutcracker infatuation.

There you have it! Now you know all about my Christmas decor obsession and now I want to know ALL about yours. If you don’t have a blog and would like to share tell me all about it in your comment.

There you have it! Now you know all about my Christmas decor obsession and now I want to know ALL about yours. If you don’t have a blog and would like to share tell me all about it in your comment.
Be sure that you link up to your Christmas Decor Obsession post so we are able to locate it and please link back to Domestic Princess in Training so others are able to find us and join in on the fun!
Friday, December 04, 2009
Flocked Pinecones
We recently visited family in East Texas and had a pinecone hunt! My family is super competitive and will turn anything into a competition…....a fun one of course! My Mom and I had a contest to see who could find the BEST pine cone; 4 bags full of pinecones later we finished our little competition.
Now that I have pinecones out the wazoo I knew I needed to come up with a few ways to use them throughout our home this Christmas. Pinecones are readily available and are a wonderful option to decorate your home for the holidays all while keeping cost down.


It gets messy so wear gloves if you have them

Mix glitter and snowflakes in a plate, spray your pine cone with glue and go to town.

After you cover your pine cone in the snow mixture spray another light coat and sprinkle more glitter over the pine cone for a little extra bling.

Here are a few inspirational pictures of
ways you can use pinecones throughout your home.
 Image from: Country Living
 Image from: Country Living
This would be so pretty with flocked pinecones!
 Image from: Country Living
I’m planning on using the ones I made to do something like this. Image from: Martha Stewart Living
Now that I have pinecones out the wazoo I knew I needed to come up with a few ways to use them throughout our home this Christmas. Pinecones are readily available and are a wonderful option to decorate your home for the holidays all while keeping cost down.

Here’s what I used for this project:
*Snow Frost and Iridescent Snow Flaks, (both purchased at Wal-Mart for $2 a bag)
*White and Silver Glitter
*Spray Adhesive
*Snow Frost and Iridescent Snow Flaks, (both purchased at Wal-Mart for $2 a bag)
*White and Silver Glitter
*Spray Adhesive

It gets messy so wear gloves if you have them

Mix glitter and snowflakes in a plate, spray your pine cone with glue and go to town.

After you cover your pine cone in the snow mixture spray another light coat and sprinkle more glitter over the pine cone for a little extra bling.
I had some metallic gold spray paint on hand so I sprayed a few pinecones gold. It really catches the simmer of the glitter. I wish I had some white spray paint….I think white would be soooo beautiful! I’ll probably break down and pick up a can even though I’m trying real hard to come up with projects using things I already have around my home.

Here are a few inspirational pictures of
ways you can use pinecones throughout your home.
 Image from: Country Living
 Image from: Country Living
This would be so pretty with flocked pinecones!
 Image from: Country Living
I’m planning on using the ones I made to do something like this.
 Image from: Martha Stewart Living
Thursday, December 03, 2009
Ribbon Scraps
Stop!!! Don’t throw away your ribbon scraps, you can use them to make this…….
 I had some ribbon scraps left over from a project and couldn’t bring myself to throw them away; they’re just too pretty. I played around with them and came up this,Uhhhhh let’s call it a ribbon rosette. It’s super simple and I’m sure you can find many, many uses for them.
Here's what ya do…..

Bunch them together..........

and bend them until you get a shape you like. I used wired ribbon. You probably will not get the same effect if you use a ribbon that is not wired.

Get out your trusty stapler and staple the bottom tip. Cut tips of ribbon in a V shape and play with it until you get a shape you like. Super simple….right?

I made a bunch for the garland on my stair railing. I won’t lie this project started off as a way to use the scraps I had but I loved it so much I actually cut extra ribbon to make more!

So many options! What about adding them to your tree?

Or giving a Christmas package a little love.

Now I just need to think of something to do with these pretties

Just a reminder……..
 I had some ribbon scraps left over from a project and couldn’t bring myself to throw them away; they’re just too pretty. I played around with them and came up this,Uhhhhh let’s call it a ribbon rosette. It’s super simple and I’m sure you can find many, many uses for them.
Here's what ya do…..
Lay your ribbon scraps out like so.

Bunch them together..........

and bend them until you get a shape you like. I used wired ribbon. You probably will not get the same effect if you use a ribbon that is not wired.

Get out your trusty stapler and staple the bottom tip. Cut tips of ribbon in a V shape and play with it until you get a shape you like. Super simple….right?

I made a bunch for the garland on my stair railing. I won’t lie this project started off as a way to use the scraps I had but I loved it so much I actually cut extra ribbon to make more!

So many options! What about adding them to your tree?

Or giving a Christmas package a little love.

Now I just need to think of something to do with these pretties

Just a reminder……..
Our linky party (What’s your Christmas Décor Obsession) is on Dec 9th. If you want to know more just click the button on the side bar. It will direct you to all the info.
Tuesday, December 01, 2009
Trimming the Tree Day 2


The tree is finished and I’m ready to move on to the rest of our home. Before I do I wanted to share just a few more things I do to decorate our tree all while staying on budget.
If you missed the clips from yesterday you can find them HERE.
Let’s get started...
Rounding out Your Tree
Let’s get started...
Rounding out Your Tree
Adding Flowers and Fancy Frills
Buying Items such as flowers, ribbon, and berries can get expensive. Here are a few options of ways you can collect these items and keep the cost down.
*Use coupons whenever possible. Craft stores that sale items such as these always have a coupon in the Sunday paper
*Stock up after Christmas when everything is marked down. You may not be able to use them on your tree this year but you will be happy you have them when next year rolls around.
*Check local Goodwill and Thrift Stores. They often have berries and flowers that people have thrown out. You can collect these items throughout the year as you come across them. This how I came across the sticks of berries I showed in the clip above.
*Deconstruct an old wreath you are no longer using or pick one up at your local thrift store. I’ve found some really great sprigs this way. The glitter leaves I showed in my clip came from an old wreath I no longer wanted. I even found an old Christmas wreath at Goodwill that bit the dust (it was $1.50). I pulled a few things off it and plan to repurpose them in when I start wrapping gifts. For a $1.50 you can’t beat it!
*Don’t forget the Dollar Tree. They have tons of great options for things you can stick in your tree or garland to give it that extra pop! *Get out the glitter and spray paint and spruce up some pine cones! They are easily available and would be a wonderful way to add a little nature to your tree.
I'm linking up with:
Reinvented who is also having a great giveaway! Stop by her blog and check it out...I think you will be happy you did.
Saturday, November 28, 2009
Trimming the Tree (including video clips)
Like most, I LOVE to decorate for Christmas. I in my genes and I can’t help it. I started collecting ornaments and Christmas décor before I had a home of my own. I still think I need more but Kent thinks I go wayyyy over board! I have no idea how a Mrs. Clause became engaged to a Mr. Scrooge (aka Kent) but I am and we make it work…..with a few little arguments along the way. ;0) Even though he hates all the fuss and mess he still helps me lug down the Christmas decorations from the attic year after year. He even finds a little Christmas cheer and complements on all my hard work! Mr. Scrooge can be a softy sometimes.
My ALLLL time favorite thing to decorate is our Christmas tree! This year we purchased a new tree from an online vendor. I was super nervous purchasing a tree I had never seen but it all worked out! It was a great price (20% off), free shipping, and good quality. I was pleasantly surprised with the tree and the whole experience!
I wanted to do post about adding pizazz to your tree all while staying on a budget. Decorating a tree and making it look over the top can be extremely pricey but I’m cheap (as you know) and try to decorate my tree on a budget so I thought it would be fun to share a few tips and tricks. I started working on the post but it was hard to describe what I wanted to talk about and take just the right picture to explain it so I decided to break it down into a few video post.
Let’s gets started.........
But first a WARNING: I am by no means a video pro nor am I trying to be one so please excuse my bobbles and mess-ups along the way. We are all friends here, right? Decorating from the Inside Out
Giving your Ornaments a Little Extra Boost!
Giving you Tree some Love and “The Step Back”
Still lots more to do! Check back tomorrow for a few more video clips as I finish and fill the tree with flowers, sprigs, and even MORE glitter!
I'm linking up with:
The DIY Show Off
Between Naps on the Porch
Blue Cricket Design
Monday, November 23, 2009
Target 2-Day Sale: War Room
Have you seen the Target 2 Day sale commercials? They are too funny! Here’s my favorite. To see the others visit youtube.com and type Target 2 Day sale.
Thursday, November 19, 2009
Christmas Craft
Do you guys follow Southern Hospitality? Well if you don’t your missing out. Her blog is full of thrifty treasures and get projects…….like this one!
Rhoda crafted a few signs that I fell in LOVE with so I decided to tackle the project.
Click HERE to see Rhoda’s informative how-to.
At the bottom of this post I’ll give you a few extra tips and tricks in case you decide to make your own set.
Rhoda crafted a few signs that I fell in LOVE with so I decided to tackle the project.
Click HERE to see Rhoda’s informative how-to.
At the bottom of this post I’ll give you a few extra tips and tricks in case you decide to make your own set.


Tips and Tricks
1. If you decided to paint your letters and or wood base white spray them with a primer first. This wood just soaks up pain. I didn’t and I used a whole can of spray paint for these bad boys. What a waste! When I thought about primer it was already too late.
2. Sand down any rough edges before you spray paint. I didn’t do this (don’t know why I didn’t do it) and I had to sand and re-spray over the sanded edges.
3. Make sure you have some down time or do not mind doing this project in intervals. There is a lot of waiting while things are drying (spray paint, modge podge, wood glue, painted polkadaots, top coat). I just cleaned house while I was waiting.
4. I used a rolling pin to roll out roll out air bubbles after I applied scrapbook paper. It worked really well and I did not end up with any wrinkling or air bubbles. If you do not have a rolling pin you can also use Rhoda’s technique.
5. The boards I purchased have a raised center which made it hard to precut the paper. I tried to trace as close as I could to the actual size of the raised board. I applied the paper and let the Modge Podge dry. Once the paper was harder I went back in with my scissor and cut around the edges to make them flush. I then dip my finger in a little Modge Podge and ran it along to side to seal them.
6. Use Rhoda’s tip to create the polkadots (such a great idea). The more paint you apply to the tip of the eraser the bigger your polkadot will be.
7. If you mess up on one of your polkadots just use a damp paper towel to wash it off and start over. I originally had black polkadots as well and didn’t like them when it was all finished. I carefully wiped them off and used another color to cover any residue that way left behind. You can also use a q-tip with a little waterdown nail polish to remove any excess residue after wipping.
8. I wiped a little stain not only on the wood but over the scrapbook paper and letters as well. I did this after everything was dry.
9. To secure the ribbon to the back of the plaque I made a little loop (I used this loop to hang the sings on the wall) and nailed the ends of the ribbon to the back board. Once they were hooked on the wall I used a separate strand of ribbon and tied a bow over the nail. Hope I’m not making this sound too confusing; it’s really not.
10. Oh I almost forgot, I finished it off with a top coat to give it little shine.
Such a great project!! I’m planning on making a different set to use in my kitchen after Christmas that says EAT. You could recreate this and make a set for a shower gift with the child's name, hostess gift, Christmas gift, teacher gift……….
Tuesday, November 17, 2009
Pumpkin Spice Coffee Killer
Meet one of my best buds…...Mr. Keurig. I visit him often epically when I’m feeling a little sluggish. He recently introduced me to a new friend….Pumpkin Spice Coffee. Mr Keurig and Pumpkin Spice Coffee have been friends for awhile but I had no idea! Sham on Mr. Keruig for keeping a secret from me. I loved Mr Pumpkin Spice Coffee soooo much that I had to invite a bunch of his brothers and sisters to come live with me and Mr. Keurig

The Pumpkin Spice Coffee family was hard to track down! I had to visit several Bed Bath and Beyonds before I found them. They were so popular I knew I needed to invite as many as I could to come home with me.


The Pumpkin Spice Coffee family was hard to track down! I had to visit several Bed Bath and Beyonds before I found them. They were so popular I knew I needed to invite as many as I could to come home with me.

I even bribed them with a cozy place to sleep. Little do they know they won’t last long! Shame on ME for tricking them. I hope Mr. Keurig will still be my friend after he notices the Pumpkin Spice Coffee family is no longer in existence. Shhhh......don’t say anything, no need to tell him now ;0)

Can you tell I’m procrastinating? I should be getting my garage sale goodies together. Ok back to the dungeon aka garage.
Paper Scraps
I was waiting for these to dry........

saw a bunch of paper scraps that I just couldn’t throw away......


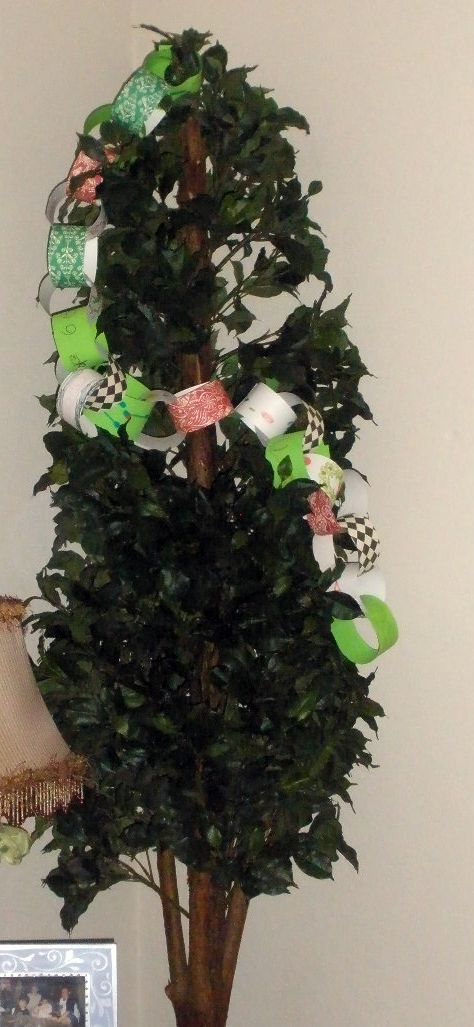
so I cut them into strips and added some extra paper so I had 25 strips total. You know where I’m going with this right? I’m keeping it old school…..a countdown to Christmas chain? I remember making one of these when I was in elementary school.

I bagged the strips of paper up with markers and glitter glue and headed over to watch my friends little girl who by the way is also my flower girl :o)
We got the markers and glitter glue and went to town. She drew pictures of all things Christmas themed. I turned our Christmas project into a little math lesson as we counted to 25 and talked about subtraction.

After we were all done we hung the Christmas chain on the tree in her bed room and read a Christmas bedtime story. I know, I know, I skipped a holiday ;o)

I still had a few odd shaped paper scraps left so I got out the
fancy scissors and yet again the glitter glue and made some gift tags!


After we were all done we hung the Christmas chain on the tree in her bed room and read a Christmas bedtime story. I know, I know, I skipped a holiday ;o)
I still had a few odd shaped paper scraps left so I got out the
fancy scissors and yet again the glitter glue and made some gift tags!

Sunday, November 15, 2009
Spruce up your Christmas Cards
It’s that time of year when I start to pull out the old address book, get my little Christmas card station set up, and go to town. Normally there is a wide range of cards to choose from but this year I was having a hard time finding just the right card or the right price (I’m cheap remember).

I found these at Ross and purchased them for $4.99 for a box of 12; pretty good compared the $18.00 cards I really wanted. I thought they needed a little pizazz so I pulled out the glitter glue and gave them some love!

It was hard to get a good picture of the glitter but it just adds a little pop and makes them fancy. Kent even commented on them which is a BIG deal because he normally doesn't notice stuff like that.

A simple a way to spruce up inexpensive Christmas cards.

I found these at Ross and purchased them for $4.99 for a box of 12; pretty good compared the $18.00 cards I really wanted. I thought they needed a little pizazz so I pulled out the glitter glue and gave them some love!
If you click on the picture you can see the glitter a little better.

It was hard to get a good picture of the glitter but it just adds a little pop and makes them fancy. Kent even commented on them which is a BIG deal because he normally doesn't notice stuff like that.

A simple a way to spruce up inexpensive Christmas cards.
Ps…If you’re on the hunt for economical Christmas cards I was in Walgreens the other day and saw some cute ones. I picked up a few boxes for myself. I believe they were $6.00 for a box of 12. They also had some that were $3.00 a box!
I'm linking up with:


