
Like most, I LOVE to decorate for Christmas. I in my genes and I can’t help it. I started collecting ornaments and Christmas décor before I had a home of my own. I still think I need more but Kent thinks I go wayyyy over board! I have no idea how a Mrs. Clause became engaged to a Mr. Scrooge (aka Kent) but I am and we make it work…..with a few little arguments along the way. ;0) Even though he hates all the fuss and mess he still helps me lug down the Christmas decorations from the attic year after year. He even finds a little Christmas cheer and complements on all my hard work! Mr. Scrooge can be a softy sometimes.
My ALLLL time favorite thing to decorate is our Christmas tree! This year we purchased a new tree from an online vendor. I was super nervous purchasing a tree I had never seen but it all worked out! It was a great price (20% off), free shipping, and good quality. I was pleasantly surprised with the tree and the whole experience!
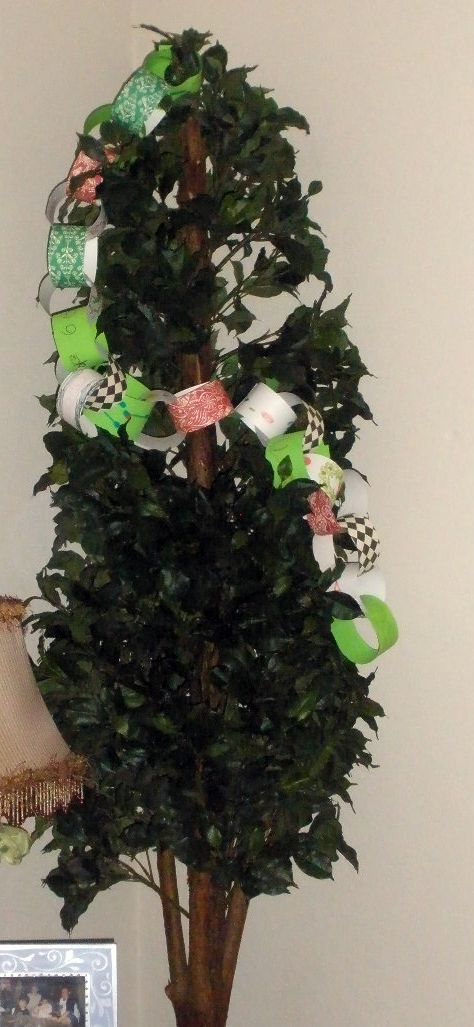
I wanted to do post about adding pizazz to your tree all while staying on a budget. Decorating a tree and making it look over the top can be extremely pricey but I’m cheap (as you know) and try to decorate my tree on a budget so I thought it would be fun to share a few tips and tricks. I started working on the post but it was hard to describe what I wanted to talk about and take just the right picture to explain it so I decided to break it down into a few video post.
Let’s gets started.........
But first a WARNING: I am by no means a video pro nor am I trying to be one so please excuse my bobbles and mess-ups along the way. We are all friends here, right? Decorating from the Inside Out
Giving your Ornaments a Little Extra Boost!
Giving you Tree some Love and “The Step Back”
Still lots more to do! Check back tomorrow for a few more video clips as I finish and fill the tree with flowers, sprigs, and even MORE glitter!
I'm linking up with:
The DIY Show Off
Between Naps on the Porch
Blue Cricket Design
Saturday, November 28, 2009

Monday, November 23, 2009
Target 2-Day Sale: War Room
Have you seen the Target 2 Day sale commercials? They are too funny! Here’s my favorite. To see the others visit youtube.com and type Target 2 Day sale.
Thursday, November 19, 2009
Christmas Craft
Do you guys follow Southern Hospitality? Well if you don’t your missing out. Her blog is full of thrifty treasures and get projects…….like this one!
Rhoda crafted a few signs that I fell in LOVE with so I decided to tackle the project.
Click HERE to see Rhoda’s informative how-to.
At the bottom of this post I’ll give you a few extra tips and tricks in case you decide to make your own set.
Rhoda crafted a few signs that I fell in LOVE with so I decided to tackle the project.
Click HERE to see Rhoda’s informative how-to.
At the bottom of this post I’ll give you a few extra tips and tricks in case you decide to make your own set.


Tips and Tricks
1. If you decided to paint your letters and or wood base white spray them with a primer first. This wood just soaks up pain. I didn’t and I used a whole can of spray paint for these bad boys. What a waste! When I thought about primer it was already too late.
2. Sand down any rough edges before you spray paint. I didn’t do this (don’t know why I didn’t do it) and I had to sand and re-spray over the sanded edges.
3. Make sure you have some down time or do not mind doing this project in intervals. There is a lot of waiting while things are drying (spray paint, modge podge, wood glue, painted polkadaots, top coat). I just cleaned house while I was waiting.
4. I used a rolling pin to roll out roll out air bubbles after I applied scrapbook paper. It worked really well and I did not end up with any wrinkling or air bubbles. If you do not have a rolling pin you can also use Rhoda’s technique.
5. The boards I purchased have a raised center which made it hard to precut the paper. I tried to trace as close as I could to the actual size of the raised board. I applied the paper and let the Modge Podge dry. Once the paper was harder I went back in with my scissor and cut around the edges to make them flush. I then dip my finger in a little Modge Podge and ran it along to side to seal them.
6. Use Rhoda’s tip to create the polkadots (such a great idea). The more paint you apply to the tip of the eraser the bigger your polkadot will be.
7. If you mess up on one of your polkadots just use a damp paper towel to wash it off and start over. I originally had black polkadots as well and didn’t like them when it was all finished. I carefully wiped them off and used another color to cover any residue that way left behind. You can also use a q-tip with a little waterdown nail polish to remove any excess residue after wipping.
8. I wiped a little stain not only on the wood but over the scrapbook paper and letters as well. I did this after everything was dry.
9. To secure the ribbon to the back of the plaque I made a little loop (I used this loop to hang the sings on the wall) and nailed the ends of the ribbon to the back board. Once they were hooked on the wall I used a separate strand of ribbon and tied a bow over the nail. Hope I’m not making this sound too confusing; it’s really not.
10. Oh I almost forgot, I finished it off with a top coat to give it little shine.
Such a great project!! I’m planning on making a different set to use in my kitchen after Christmas that says EAT. You could recreate this and make a set for a shower gift with the child's name, hostess gift, Christmas gift, teacher gift……….
Tuesday, November 17, 2009
Pumpkin Spice Coffee Killer
Meet one of my best buds…...Mr. Keurig. I visit him often epically when I’m feeling a little sluggish. He recently introduced me to a new friend….Pumpkin Spice Coffee. Mr Keurig and Pumpkin Spice Coffee have been friends for awhile but I had no idea! Sham on Mr. Keruig for keeping a secret from me. I loved Mr Pumpkin Spice Coffee soooo much that I had to invite a bunch of his brothers and sisters to come live with me and Mr. Keurig

The Pumpkin Spice Coffee family was hard to track down! I had to visit several Bed Bath and Beyonds before I found them. They were so popular I knew I needed to invite as many as I could to come home with me.


The Pumpkin Spice Coffee family was hard to track down! I had to visit several Bed Bath and Beyonds before I found them. They were so popular I knew I needed to invite as many as I could to come home with me.

I even bribed them with a cozy place to sleep. Little do they know they won’t last long! Shame on ME for tricking them. I hope Mr. Keurig will still be my friend after he notices the Pumpkin Spice Coffee family is no longer in existence. Shhhh......don’t say anything, no need to tell him now ;0)

Can you tell I’m procrastinating? I should be getting my garage sale goodies together. Ok back to the dungeon aka garage.
Paper Scraps
I was waiting for these to dry........

saw a bunch of paper scraps that I just couldn’t throw away......


so I cut them into strips and added some extra paper so I had 25 strips total. You know where I’m going with this right? I’m keeping it old school…..a countdown to Christmas chain? I remember making one of these when I was in elementary school.

I bagged the strips of paper up with markers and glitter glue and headed over to watch my friends little girl who by the way is also my flower girl :o)
We got the markers and glitter glue and went to town. She drew pictures of all things Christmas themed. I turned our Christmas project into a little math lesson as we counted to 25 and talked about subtraction.

After we were all done we hung the Christmas chain on the tree in her bed room and read a Christmas bedtime story. I know, I know, I skipped a holiday ;o)

I still had a few odd shaped paper scraps left so I got out the
fancy scissors and yet again the glitter glue and made some gift tags!


After we were all done we hung the Christmas chain on the tree in her bed room and read a Christmas bedtime story. I know, I know, I skipped a holiday ;o)
I still had a few odd shaped paper scraps left so I got out the
fancy scissors and yet again the glitter glue and made some gift tags!

Sunday, November 15, 2009
Spruce up your Christmas Cards
It’s that time of year when I start to pull out the old address book, get my little Christmas card station set up, and go to town. Normally there is a wide range of cards to choose from but this year I was having a hard time finding just the right card or the right price (I’m cheap remember).

I found these at Ross and purchased them for $4.99 for a box of 12; pretty good compared the $18.00 cards I really wanted. I thought they needed a little pizazz so I pulled out the glitter glue and gave them some love!

It was hard to get a good picture of the glitter but it just adds a little pop and makes them fancy. Kent even commented on them which is a BIG deal because he normally doesn't notice stuff like that.

A simple a way to spruce up inexpensive Christmas cards.

I found these at Ross and purchased them for $4.99 for a box of 12; pretty good compared the $18.00 cards I really wanted. I thought they needed a little pizazz so I pulled out the glitter glue and gave them some love!
If you click on the picture you can see the glitter a little better.

It was hard to get a good picture of the glitter but it just adds a little pop and makes them fancy. Kent even commented on them which is a BIG deal because he normally doesn't notice stuff like that.

A simple a way to spruce up inexpensive Christmas cards.
Ps…If you’re on the hunt for economical Christmas cards I was in Walgreens the other day and saw some cute ones. I picked up a few boxes for myself. I believe they were $6.00 for a box of 12. They also had some that were $3.00 a box!
I'm linking up with:
Saturday, November 14, 2009
Giving an Old Chalkboard NEW Life
I know, I know….another chalk board. Chalkboards are like diamonds,
a gal can never have too many!
a gal can never have too many!
I picked this little lady up at GW for $4.99. I thought the price was a little high but I knew just the place for it and I we were in need of a menu board in our kitchen.

I pulled the picture off, gave it a new coat of chalk board
paint, and dressed her up with a little bow.
bow.
paint, and dressed her up with a little
bow. 
I picked up some magnets at Home Depot and stuck them to the back. I knew it would get a lot of wear and tear so I outlined the back with magnetic strips so it has a lot of support.

Here she is all dressed up and looking good. She’s on the side our fridge. We don’t have a lot of wall space in the kitchen and I desperately wanted a menu board so I had to think outside the box. I have plenty of room to write and it even has a little chalk board tray at the bottom.
Love it!

Wednesday, November 11, 2009
Doing a Little Deep Cleaning
Last year I got feed up with my unorganized bathroom and decided to do something about it. Don’t get me wrong it’s still a mess most of the time but I do keep things organized. I’m in the middle of doing a lot of organizing and deep cleaning around the house. I deiced to take all my makeup and doodads out of their containers and give them a good scrub. Since they are all clean and makeup residue free I thought I would show you how I keep all my girly things organized.
This is one of the draws in my master bath vanity. I use the plastic tub for all my hair frillies and organize my bobby pins and rubber bands in the two clear jars (from Ikea). Yes, I’ll admit it I own shower caps….and yes I said caps meaning more than one. I keep them rolled and tucked next to the plastic tub. I’ve read in a few magazine that shower caps are out but if you have naturally curly hair you know they will never be out! The knitted things you see on the side are a new Sam Moon purchased. I can’t wait for it to get cold so I can wear them. I’ll show you what they look like on a later date.

I bought these little white tubs at Wally-World. The one on the left houses random things and I put my manicure whatnots in the on the right side. When we first moved in our home we lined all our drawers and cabinets with cheap linoleum. I first talked about that HERE.

Ahh and the drawer I use the most…..my makeup drawer! Here’s the layout: eyeliners, lipliners, and mascara on the left, face makeup in the middle, makeup brushes on the right and all my eye shadows tucked away in the back. If I want to do something fun with my eye makeup I usually pull that bin out so I can see all the goodies. I put the colors I use often towards the front so they are easy to find.

This is the cabinet under my sink. A Lazy Susan makes it easy for me to get to all my lotions and hair supplies. Humm I should fancy it up and bit and decoupage some scrap book paper on it! I’ll add that to my never ending list.

This is also under my sink. I use this tub to house all my makeup bags. If I’m out of town or getting ready outside of my home I usually grab one of these to carry all my makeup, toothbrush…..whatever. This makes it easy for me to see what I have so I can pick the right size makeup bag; they’re organized smallest to largest.
The small box in front is an old container that came with some face wash cloths. I use it to store my nail polish.


I didn’t get a picture of this one but I also keep a basket on my bathroom counter that I use as a catch all for the things I use daily (moisturizer, face wash, toothpaste,…..). I think it looks a little nicer tossed in a cute basket verses scattered all over the counter. Kent has one on his counter too.
I’m a messy person by nature so I have to work really hard to keep things clean and organized (like I said my home is not always clean. Don’t forget I’m still a domestic princess in training). It’s all about finding a system that works best for you, something that will work with your daily routines and make it easy for you to stay organized.
So, what are some ways that you keep all your girly goodies organized?
I'm linking with with:
Tuesday, November 10, 2009
Tassels
I think I've found my new obsession......TASSELS! I've been making them like crazy and LOVE it! Here are a few that I've finished.


I hope you love tassels because I have a feeling they will be making a few appearances.
Weight Loss Challenge: Week 4
It’s a short week (in regards to our challenge) but I still want to know how you did last week. Questions for last week are below. Our Weight Loss challenge officially ends on Wednesday November 12th. On Wednesday I’ll post a challenge wrap up with a few questions for you to blog about (if you choose to). I’ll also talk about our Weight Loss Challenge giveaway!
1. How was your week?
Humm…..let’s just say it was ok; not bad but not good. I worked out 2 times but kept extremely busy running all over the place. When things get busy it seems the first thing that goes out the window is my diet.
2. If any, what were the challenges you faced?
Our restaurant had a booth at an elementary school festival over the weekend. I was serving up pizza left and right! I ran out of time after getting everything set up for the event and didn’t eat lunch. I was starving and the pizza was looking real good but I didn’t eat any…..not one slice! Kent who was running pizzas back and forth during the event showed up with a healthy sandwich for me. I know, how sweet is he?
After the event we treated ourselves to a movie. Kent left to go to the bathroom and came back with a huge and I’m talking jumbo size bucket of buttered popcorn. We never get popcorn at the movies I have no idea why he thought it was good idea that night. He thought he was doing something sweet….”We can share it” he said. Ahh that popcorn smelled so good but I stayed focused on the movie and made through most of the movie without having any; even with it being passed over me to our friend who was sitting on the other side of me. The last few minutes of the movie my hand decided to dive into the popcorn bucket (all on its own)! It hung out there for a few minutes while I talked it down :o) I pulled my hand out of the XXXXXXL size bucket popcorn free! I was so happy that I didn’t cave. I was tempted but didn’t do it. After the move Kent made a comment about gross he felt after he ate all that popcorn, and that he had no idea why he thought it was a good idea to buy it. You can guess what I was thinking.
3. Do you have a favorite motivational quote or saying that you think about when things get tough? Include that here or find a new one that you can think about next week when something is trying to sway your progress next week. Be sure you share your quote or saying with us.
At the end of every WW meeting we end with a motivational quote. I write them down so I can look back at them during the week.
*"You must begin to think of yourself as becoming the person you want to be." -David Viscott
*"Living a healthy lifestyle will only deprive you of poor health, lethargy, and fat." -Jill Johnson
*"Instead of giving myself reasons why I can't, I give myself reasons why I can." Unknown
*This is one of my favorites:"I shall shape my future. Whether I fail or succeed shall be no man's doing but my own. I am the force; I can clear any obstacle before me. Or I can be lost in the maze. My choice. My responsbility. Win or lose, only I hold the key to my destiny."-Anonymous
Wednesday, November 04, 2009
Super Simple Dessert Stand
I was at good ole Goodwill a few weeks ago and came across the yellow and white ceramic candle holder you see below. It became mine for .59! One gal’s trash will soon
become my treasure with a little help from E-6000.
become my treasure with a little help from E-6000.

I took some time looking for the right plate to complete my project. I wanted something fancy but of course cheap. I came across this guy at Ross. He was only $3.00! For $3.59 I had my self a new cake stand, fruit stand, dessert dish, we can just call it a whatever stand (I can place whatever my little heart desires on it).

I’m not going to lie I originally planned on making this as a gift but it sure looks super cute on our island and I’ve been wanting to add a little yellow to our decor.
Hummm maybe I’ll be bad and keep it ;o)

Project Tips*E-6000 is a wonderful glue and it’s dishwasher safe! I purchased mine at Wal-Mart.
*Just follow the directions on the package and you’ll be all good.
*When looking for a candlestick to complete this project you want to be sure it has a flat surface to adhere the plate to; the thicker the surface the more surface area to apply glue.
*After I applied the glue and everything stuck together I placed some weight on the plate while I waited for the glue to dry (I used a juice bottle).
Tuesday, November 03, 2009
Halloween Pictures
Jon and Kate was a hit! I planned on making the shirt I blogged about last week (thank you for helping me decide) but our inkjet printer decided to go on the fritz so I had to act fast and go with plan B! I used our laser printer and made a Kate plus 8 pin with a BIG X on Jon’s face. It’s hard to see especially since it’s not in color but people thought it was funny.


Kent showing off his props. I found some huge clip on ear rings at Sam Moon. They were a hoot!

One of the many cool costumes we saw that night. I wish I would have
taken more pictures but I felt bad asking people.

Geico Cavemen

Our friend Steve looking super creepy!

Even the dogs got in on the fun.
Little Abby was a ballerina.

Doesn't Parker look so happy.......not!

Parker the Police Dog :o)


I got to be mean and yell all night!

Kent played a great Jon! I kept telling him he looked mean in his pictures but he said that was the plan.


Kent showing off his props. I found some huge clip on ear rings at Sam Moon. They were a hoot!

One of the many cool costumes we saw that night. I wish I would have
taken more pictures but I felt bad asking people.

Geico Cavemen

Our friend Steve looking super creepy!

Even the dogs got in on the fun.
Little Abby was a ballerina.

Doesn't Parker look so happy.......not!

Parker the Police Dog :o)

Did you or your little ones dress up for Halloween? If so what did you dress up as?
Monday, November 02, 2009
Weight Loss Challenge: Week 3
Well we've made it to week 3 and have a week and a half to go!
Let's get started with this weeks questions.
Let's get started with this weeks questions.
1. How was your week?
I had a good week! I made it to the gym 3 times (still not my original goal but a vast improvement from last week). I lost 2lbs so I guess staying on track and working out did me good!
2. Did you have any challenges?
I attend a Weight Watcher meeting every Thursday morning. I woke up Thursday feeling a little off but I went to my meeting anyway. I decided that I was going to weigh in, skip the meeting and head to the doctor. I made it out to my car and realized that I was breaking one of the goals I set. I set a goal that I would not miss a meeting…..no excuses! I put my keys back in my purse and went right back inside. Pardon me while I give myself a BIG pat on the back!! Don’t worry I knew it I didn’t have anything contagious. I went to the doctor after I finished the meeting and am doing much better. Today is the first day I’m feeling more like myself (I had a bladder infection in case you’re wondering). Since I was sick it interfered with my workouts a bit but I’m glad that I got a few sessions in earlier in the week.
I’m having a problem with making poor choices during the weekend. I do great during the week but for some reason when Friday hits I go a little crazy. I’m thinking about changing my meeting to Monday evenings so I have to be good during the weekends too.
3. What are some of your favorite healthy foods items that are a must have?
I love anything mint flavored and mint chocolate chip ice cream is my fav! WW makes a really good 2 point ice cream.

I just found these guys a few weeks ago and love them! The veggies are already pre-portioned and topped with Italian seasoning.....good stuff. I usually heat one up and eat it with a Lean Cuisine for lunch.

1. Frozen blueberries: I add these to my oatmeal in the morning. The heat from the oatmeal warms them up.
2. Kashi waffles: I topped these with a little honey and diced walnuts. Great for a weekend breakfast when I have a little more time in the mornings to sit and enjoy.
3. Valley Fresh Steamers: These come in handy when I want to whip up a quick side to go with our meal. It's a good mixture (red potatoes, snow peas, and read bell peppers tossed in an Italian sauce)

If you follow the WW program you probably know about all about
Nature's Own bread. It's only 1 point for 2 slices.....LOVE IT!!

1. Wasa Crackers: Great for snacks and 0 points for 1 portion.
2. Fiber One Bars: Ahh if you haven't had a Fiber One bar you must! If I want something sweet these guys hit the spot and for 2 points make a wonderful snack or dessert.
3. Laughing Cow Cheese: Comes in little wedges. It's creamy and delish! So many things you can do with it. I spread it on crackers or melt in in a bake potato with a little fresh cracked pepper...YUM-YUM!

4. Share a healthy recipe you enjoying. It can be a snack, appetizer or a meal. Whatever your little heart desires as long as it’s something healthy.
Wasa cracker topped with Laughing Cow cheese.

Something else simple that I like to make for breakfast or as a snack.

Toast with a little fat free cream cheese, sliced banana, and cinnamon.
I love to have this with a cup of hot tea in the morning!

To see how I gave this little guy a face lift click HERE.
Ok it's your turn. I can't wait to see how your week went as well as you fav healthy items. Be sure that you link directly to your Weight Challenge post so we can find it.


